February 23, 2012

Viral Meen Kuzhambu

It had been a long while since I posted non-veg recipes. Its not that we don't have (obviously we have 'em on weekends) but somehow I'm missing to get snaps of the dishes I make. This weekend we made Viral Meen (Butter fish) kuzhambu. We got to know about a fresh fish market here recently and got these delicious fish there.


Fish kuzhambu is a traditional TamilNadu spice & sour gravy made of tamarind and chilly powder with fish as its main ingredient. Almost most fishes can be added for kuzhambu and each one will give u a different taste. And the smaller variety fishes are more suitable for this kuzhambu than the larger ones. We can even make it with frozen fish fillets, but I always like the taste of whole fish with bones(am drooling wen I write this). It will take a little while for the gravy to absorb the flavor of fish (vice-versa too) and it always taste better after 2 hrs or even the next day.

Our Sunday meal was very filling with Viral meen kuzhambu, Vancharam varuval(king fish fry) and Boiled Egg.


Ingredients:

Cleaned and sliced Butter fish
Tamarind juice - 2 cups
Red Chilly powder - 1 1/2 tsp
Corainder powder - 1 tsp
Curry leaves - a bunch
Oil - 2 tbsp
Fenugreek-1/2 tsp(optional)
Mustard seeds - 1 tsp
salt

To coarsely grind:
Onions - 1
Tomatoes -2
Garlic pods - 4
Cumin seeds - 1 tsp
Black Pepper- 1 tsp


Procedure:

1. Coarsely grind the ingredients to be grounded. Don't blend it to a paste. We should see the onions and peppers.

2. Heat oil in a pan and add Mustard seeds

3. After they splutter, add curry leaves and fenugreek seeds. To this add the grounded mix and saute them well for 2 mins

4. Meanwhile mix the salt,chilly powder and coriander powder to the tamarind juice. Add this mix to the pan and mix well. Check for salt and spice and add chilly powder or tamarind juice according to your taste. Let this be watery as it will thicken as it boils

5. Cover it with a lid and let it boil for 10 minutes. Now check the consistency and if it is little watery, but not too runny add the fish pieces.

6. Let this boil for 2 minutes or until fish is cooked (Fish gets cooked fast). Make sure not to boil too much after adding fish as it makes the fish to break.

7. Let it sit for atleast 1-2 hrs before serving to get the perfect taste.Serve with warm rice.


February 20, 2012

Ragi Idly

I was always a fan of Ragi. I used to like the "Ragi kuzhu"(Ragi porridge) which my mother used to make during "aadi" month. "Ragi kuzhu" + "thandu keerai kuzhambu", with curd and onions, a healthy and filling combination. This recipe is an easy way of including Ragi in everyday food if not at least once in a while. Originally got this recipe from a friend for Ragi dosa, then I tried idly too, which also came out quite nice.


Ingredients:


Ragi flour (Millet flour) - 1 cup

Unfermented idly batter - 2 cups


Procedure:

Mix the idly batter after grinding with the ragi flour. You can add little water. The consistency should be slightly thicker than the usually batter. It should not be too thick.

Allow it to ferment overnight in a warm place.

Next day, add salt as required and mix it. Pour the batter in the greased idly plates and steam it for 10 - 12 minutes.

Serve it hot with any chutney. I served it with peanut chutney.

In the same batter you can make dosa too which is also yummy.


Notes:
  • For first time, you can try this recipe with a small amount of idly batter. 
  • Adjust the amount of ragi flour as required. Usually half a cup of ragi should be correct for 1 cup of idly batter. You can try adding the flour little by little. If more ragi, the idlies may become little hard.
  • My mixing the ragi flour before fermentation, it gets mixed nicely and it tastes good.
I am submitting this recipe to OnGoing Event:Show Me Your HITS~Healthy Delights happening in Spicy Treats.. 

February 17, 2012

Noodles chat

      Evenings, by the time my husband returns home, he gets quite hungry.. And I was thinking of some recipe which should be easy and fast to prepare, at the same time should be healthy and satisfying. He loves chat, so I suddenly got this idea of trying chat with noodles. Luckily I had readymade tamarind sauce which came handy. This recipe is just a simple basic one, you can run your imagination as per your taste buds and try making it more colourful and tasty.


Ingredients:

Any Instant noodles
1 packet
Tamarind sauce /chutney
1-2 tsp or as required
Green chutney
1-2 tsp or as required
Chat masala powder
1 tsp
Chopped onions, tomato
1 tbsp
Grated carrot
1 tbsp
Boiled corn kernels
1 tbsp
Chopped Coriander leaves
As required
Sev / Boondi /Mixture
As required

Procedure:

Cook the noodles as per the instruction, but not dry, switch off the stove when it is little watery. You can reduce the seasoning powder if you want to add more spices of your choice.

Add the usual chat chutnies (tamarind chutney, and green chutney) and chat masala powder according to your taste. You can try adding less at a time and adjust according to your taste.

Add chopped onions, tomato, coriander leaves, boiled corn kernels, grated carrots according to your choice.

Add sev or boondi or mixture (or all of them) to this.

Give it a nice mix and serve it as an evening snack.


Notes:

Unlike noodles this does not required to be served hot, it tastes good even if it is just warm. Of course not cold!

You can even add  a teaspoon of curd on top of it while serving.(like dahi chat..)

Just experiment and enjoy.

Tomato Chutney

This is one of my favourite chutneys that my MIL makes. My mother used to make similar recipe, we used to call that tomato thokku, in which onions will be more and that will be good only for chapathis.
This chutney is quite easy to make (with no grinding) and tastes very good with idly/dosa and goes well with chappathis as well.


Ingredients:

Onion
1 No
Tomatoes
4 No
Red chilli powder
1 tsp
Coriander powder
1 tsp
Turmeric powder
¼ tsp
Green chilli
1 No
Garlic
2 cloves
Coriander leaves
As required
Salt
As required
To temper:
Mustard seeds
1 tsp
Cloves
1 (optional)
Cinnamon stick
1 small piece
Urid dhal
1 tsp
Asafoetida
1 pinch
Curry leaves
1 twig


Procedure:

Chop the onion and tomatoes finely.

Heat oil in a pan. Add mustard seeds and cloves & cinnamon stick. Once they splutter, add broken urid dhal, asafoetida and curry leaves.

Add the chopped onions, green chilly and crushed garlic cloves. Fry till onions become soft and transparent.

Now add the chopped tomatoes. Cover the pan and let it cook till it becomes soft.

Add all the turmeric, red chilli and coriander powders and salt. Saute this for a while.

Add half a cup of water and bring it to boil and simmer. Check for spice and salt. If the tomatoes are little tangy, you may need to adjust salt and chilli powder.

Switch off the stove at the required consistency. You may want this gravy little thick if served for chapathis. If served for idlis or dosas, a little watery will be good.

Garnish with coriander leaves and serve it as side dish for idly/dosa/chapathi.


February 13, 2012

Sandesh - Happy Valentines Day!

Its valentines day and why not celebrate with something special. Here I have Sandesh - a Bengali sweet. This recipe was in my favorites since a long time. And at last I found an occasion to make it. It was my wedding anniversary last week and I made this for the special dinner.

We need simple ingredients for making Sandesh and thats the reason why I chose to do that.... If u r a fan of milk sweets then give it a try and u'll love it.

Ingredients:
Milk - 1 litre
Powdered Sugar - 6 tbsp
Vinegar/Lime juice - 1-2 tbsp to curdle milk
Food color - optional
Cardamom powder - 1/2 tsp
Pistachios (unsalted) - for decorating (I didn't had so din't used)


Procedure:
Heat milk in a heavy bottomed pan. When it starts to boil, add vinegar/lime juice to curdle. Once it is fully curdled, strain the water using a clean filter cloth and collect the curdled milk..wash this under running water and squeeze well. Keep under a heavy pot to drain excess water. wait for half hour and paneer is ready.

Gently knead this paneer with sugar and cardamom powder to a soft dough. This can be done by blending the dough in a mixer for 30 secs. This makes the kneading easy and soft dough will be ready.

This dough has to be kept in a pan in very low heat for 5 minutes to remove the raw smell. Be careful not to overcook as it causes the paneer to crumble instead of a soft dough. At this stage I removed a small part of the dough and added color to it and heated it separtely.

Now the dough is ready. Divide it into 10 equal  parts and make Sandesh of ur desired shapes. I made circles shapes and decorated with colored ones in the middle. You can also Pistachios for decorating.

Refrigerate for min 2 hrs and serve chilled.

Happy Valentines Day! :)

Points to Note:

1. Make the final sandesh balls when the dough is still warm as it helps in making shspes without breaking

2. If the dough turned little crumbly, add a few drops of milk and blend again in the mixer

3. While making balls/shapes, use a little water as it eases the process to make perfect shapes

I'm sending this recipe for Anjali's Cakes, Cookies and Desserts Event, Tickling Palates Let’s Cook #12 ~ Sweet Somethings and Zesty Palette's Sweet Luv

February 11, 2012

Murukku - II

This is the usual simple murukku recipe made for years. I remember the days when my mom and grandma used to prepare this for diwali and we will always help them in making and eating :-) We used to pack the Diwali sweets to all our relatives in packets.. and compare the murukkus we got from them and announcing the winner :-)

Here is the standard recipe..


Ingredients:

Rice flour
2 cups
Urid dhal flour
¼ cups
Butter
11/2 tbsp
Jeera
1 tsp
Sesame seeds
1 tsp (optional)
Asafoetida
¼ tsp
Salt
As required
Oil
To deep dry

Procedure:

To make the urid dhal flour, dry roast the urid dhal till you get the nice aroma. Allow it to cool a little and grind it to fine powder.

Mix all the ingredients together with required water to make a smooth and flexible dough.

Heat enough oil in kadai to deep fry.

Fill the dough in the murukku press with the desired hole shape.

You can either press the murukku directly over oil or on greased laddles and drop it into the oil carefully.

Cook both the sides and take them out when the spluttering of oil stops. Drain in kitchen towel to remove any excess oil.

Allow it to cool and store in air tight container.

 Note:

You can optionally add red chilli powder or green chilli paste to make it little spicy.

February 9, 2012

Kaaraboondi

This was one of my favorite tea-time snack during school ages. I remember my grandfather buying this wenever he visits us. And I like the roasted peanuts in them very much. Other than snack, my mom used to make Dal-curry with this. This one will be excellent combination in curd raitha too. Here is the recipe


Making of boondis is a little tedious task, but if u follow the measurements and the batter consistency, you can master this recipe and this will be a frequent snack at your home.


Ingredients:

Besan flour 1 cup
Peanuts -1/2 cup
Red chilli powder -as per taste
curryleaves
oil for deep frying
salt to taste
water-1/2 cup

Procedure:

Mix the besan flour with water to make a smooth batter without any lumps. The batter consistency should be slightly thicker than dosa batter.

Heat the oil in a frying pan on medium heat.

Hold the ladle just 1 to 1 1/2 inches above the oil in one hand and with the other hand pour some of the batter onto the ladle such that the batter covers all of the holes.

The batter will start dropping through the holes into the oil. Drop enough boondi into the oil so that they just cover the surface of the oil in a single layer

Fry them until the sizzling sound stops and the boondis are golden browm and crispy

Place them on tissue papers to remove excess oil

Fry peanuts,curry leaves in the same oil

Add peanuts and curry leaves,sprinkle red chilli powder and salt as per your taste. Mix this to boondi and shake well.

Yummy Kaaraboondis are ready for snacking


Points to Note:

1. While frying the boondis, if they seems to absorb more oil(the bhoondis will be little porous), it means the batter has becomes watery and you have to add little more besan

2. If the shape of the boondis are little elongated and not circle, it means you need little more water to the batter

3. The batter consistency should be slightly thicker than dosa batter without any lumps

4. Make sure you wipe clean the ladle/grater after pouring every batch of batter. This avoids any holes being covered with batter.

Kaaramani kuzhambu with grounded coconut and Sesame seeds

Karamani also known as Black-eyed peas is one of my most favorite pulses. The reason is its easy to cook and has real good taste. I made this kuzhambu with raw plantain(vazhaikai). You can add brinjal also with this. The only change that I did for this traditional recipe is grinding the sesame seeds along with coconut. This gave a nice flavor and aroma just like adding Gingely oil. I use the pressure cooker method and cook all the vegetables together. If you are using cooked black-eyed peas, you can cook the vegetables on the pan itself after adding Tamarind extract and add the cooked peas before adding the ground paste.


Ingredients:

Onion - 1 medium size
Tomato - 1/2
Black eye peas - 1/4 cup
Raw plantain - 1/4 cup (cut into cubes)
Tamarind extract - 1/2 cup
Red chilli powder - 1 tsp
Coriander powder - 1 tsp
oil - 1 tbsp
Mustard seeds - 1 tsp
Cumin seeds - 1 tsp
Curry leaves
Coriander leaves
salt

To roast and grind
Sesame seeds - 1 tsp
coconut powder - 3 tsp

Procedure:

1. Heat oil in a pan and add mustard and cumin seeds.

2. After they splutter, add the cut onions and tomatoes and saute them

3. To this add raw plantain (vazhaikai), curry leaves, chili powder and coriander powder.

4. Now transfer this to pressure cooker and add the black eye peas and tamarind extract and  1 cup of water. Add required salt and pressure cook the ingredients for 3 to 4 whistles.

5. While its getting cooked in the pressure cooker, roast and grind the sesame seeds and coconut powder to a smooth paste.

6. When the pressure in the cooker is released, add the ground paste and boil it again for a minute. Now add the coriander leaves.

7. Serve with hot rice and papad.

I am sending this recipe to Cooking with Whole Foods [CWF] : Sesame seeds event hosted by Kiran happening at Kaarasaram

February 7, 2012

Semiya Idly

Got this recipe from a cookbook supplement from aval vikatan. I usually make only upma and payasam with semiya and this sounded interesting and of course easy. All in my home like vermicelli so I tried it confidently for dinner and it came out well. One good thing about this recipe is you can make more idlies with less batter :-)
Kara chutney will be the best accompaniment for this Idly.


Ingredients:

Semiya (Vermicelli)
1 cup
Idly batter
1 cup
Grated carrot
2 tbsp
Grated ginger
1 tsp
Coriander leaves
1 handful
To Season:
Mustard seeds
1 tsp
Urid dhal
1 tsp
Gram dhal
1 tsp
Chopped Green chilli
1
Curry leaves
1 twig
Hing
A pinch

Procedure:
Dry roast the semiya. Pour boiling water over it, till it is completely immersed and leave it for 3-4 mins.
The semiya should be half cooked. Drain the water and let it cool.
Mix the idly batter with the semi cooked semiya and grated carrots,ginger and coriander leaves. You can add little water to get the correct consistency. Add salt as required.
Season the batter with the items given.
Grease the idly plate with oil and pour the mixed batter.
Steam it in pressure cooker. Serve the hot idlis with kara chutney.

Kara Chutney
Here is the recipe for chutney. You can optionally add coconut to this recipe. It tastes good even without coconut.


Ingredients:
Onion
1 Big
Tomato
2
Ginger
2 cloves
Garlic
1 small piece
Red chilli
1
Coriander leaves
1 handful
Urid dhal
1 tsp
To Season:
Mustard seeds
1 tsp
Urid dhal
1 tsp
Curry leaves
1 twig
Hing
A pinch

Procedure:
Roughly chop onion and tomatoes.
Add oil in a pan and fry urid dhal.
Add chopped onions, ginger, garlic, red chilly and fry till the onions are transparent.
Add the tomatoes and cook till it becomes soft.
Allow this mixture to cool and grind it bit coarsely with chopped coriander and with required salt.
Season the chutney with mustard seeds, urid dhal and curry leaves.


Semiya Idly with chutney
 An easy and different breakfast/dinner..

February 2, 2012

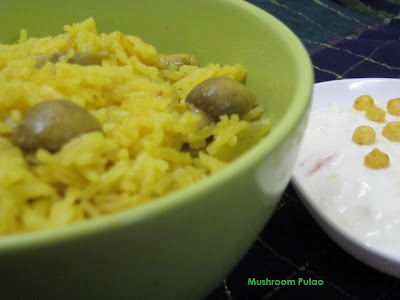
Mushroom pulao


My mother used to make this pulao and I used to love this. I think its almost the same recipe but I bet I can't compare mine to that taste..Hmm.. miss that :-(
Anyway here is the recipe..
Ingredients:

Mushroom

12-15 Nos.

Onion

1 No.

Tomato

1 No.

Mint leaves

1 handful

Coriander leaves

1 handful

Ginger garlic paste

1 tsp

Red Chilli powder

1 tsp

Coriander powder

1 tsp

Turmeric powder

1/4 tsp

Salt

As required

Water

2 ½ cups

Milk

½ cup

Basmati Rice

2 cups

Oil

1 tbsp

Ghee

1 tsp

To Season:

Whole Garam masala

4 cloves, 1 cinnamon stick, 1 bay leaf

Fennel seeds

1 tsp

Jeera

1 tsp


Procedure:
Cut the mushrooms in quarters or into 6 pieces if the mushroom is big.
Heat oil and ghee in pressure cooker or in any thick bottomed vessel.
Add whole garam masala, fennel seeds and jeera.
Add the sliced onions, saute for a while. Add ginger garlic paste and saute for few more minutes.
Now add the chopped tomatoes and mint leaves. Let it cook for sometime.
Add turmeric powder, chilli powder and coriander powder.
Add the chopped mushrooms, the mushrooms will start leaving water. Cook till all the water is absorbed.
Now add the washed rice, and mix it well with the masala. The rice tastes better if its gets slightly fried.
Pour the water and milk, usually for basmati rice for 1 cup, 1 and half cup water should be enough. Add water depending on the rice variety you use. Milk is optional, I feel it enhances the taste for this pulao.
Add salt, chopped coriander leaves. You can adjust for salt and spice now. (May be you can add red chilli powder/garam masala powder if required).
You can optionally add 1 tsp lemon juice.
Once the water starts boiling, bring it into simmer and close with the lid (No weight).


The rice should be ready in 10-12 minutes.
Once done serve it with curd raita.

This also makes great for lunch box.

Related Posts Plugin for WordPress, Blogger...